| MIX VERDICT: IZOTOPE RX 11 ADVANCED |
| THE TAKEAWAY: “While RX 11 Standard might suffice for music production, the Advanced version is as vital as food and water for professionals working in post-production and restoration. ” |
| COMPANY: iZotope • www.izotope.com PRICE: RX 11 Advanced $1,199; RX 11 Standard $399; RX 11 Elements $99; Post Production Suite 8 (includes RX 11 Advanced and enterprise-level licensing) $1,799. PROS: • Mid-side processing. • Dialogue Isolate’s multiband noise reduction and Music Rebalance’s separation are shockingly effective. • Loudness Optimize sounds great with little to no manual adjustments. CONS: • Dialogue Isolate’s noise- and reverb-reduction functions share the same multiband control settings. • Dialogue Contour’s new Variation slider poses potential pitch and timbre tradeoffs. |
Every time iZotope releases a major upgrade to its preeminent RX software, I think to myself, “That’s it. Anything else they might add later will be incremental improvements to its existing algorithms.” Quite the contrary.
The new RX 11 Advanced adds novel tools to its formidable arsenal, providing, for example, a solution to an odd complication with streaming music that I’ll bet you didn’t even know existed (I didn’t). Also, some of the updates to RX’s legacy modules and plugins are anything but minor, introducing powerful multiband and mid/side processing.
As with past releases, RX is available in three versions with progressively deeper feature sets: Essential (stripped-down), Standard (mid-tier) and Advanced (flagship). I review the latter’s new features here.
SIDE DISH
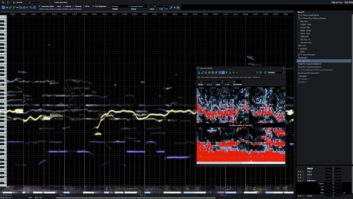
The standalone Editor’s new Channel Mode lets you alternately display a stereo track as separate left and right or mid and side channels; you can apply processing to either or both channels displayed. This is a game-changer for restoration work on stereo music, where you might have noise or excess room tone on electric guitars in the side channel and not on the center-panned bass, kick drum and lead vocal.
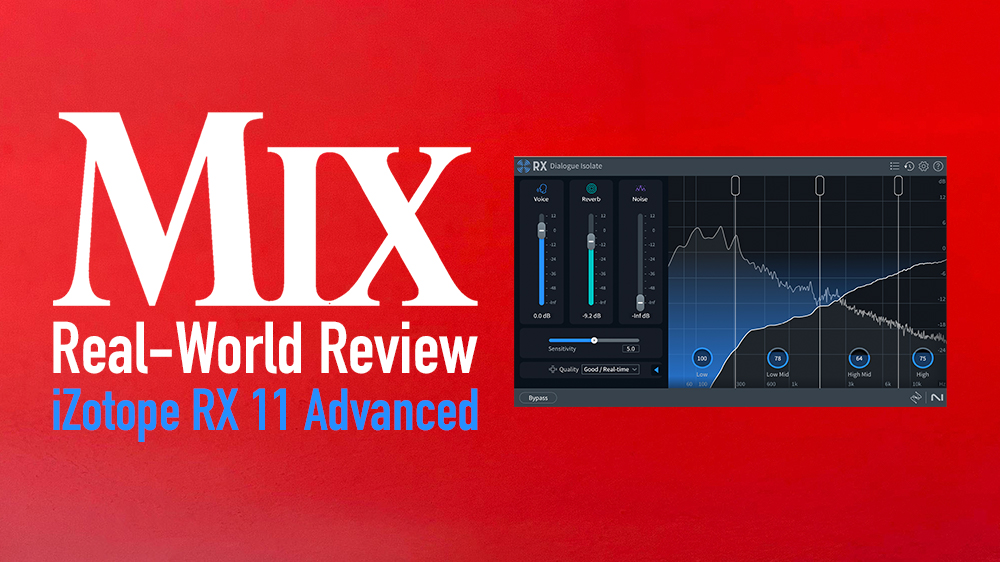
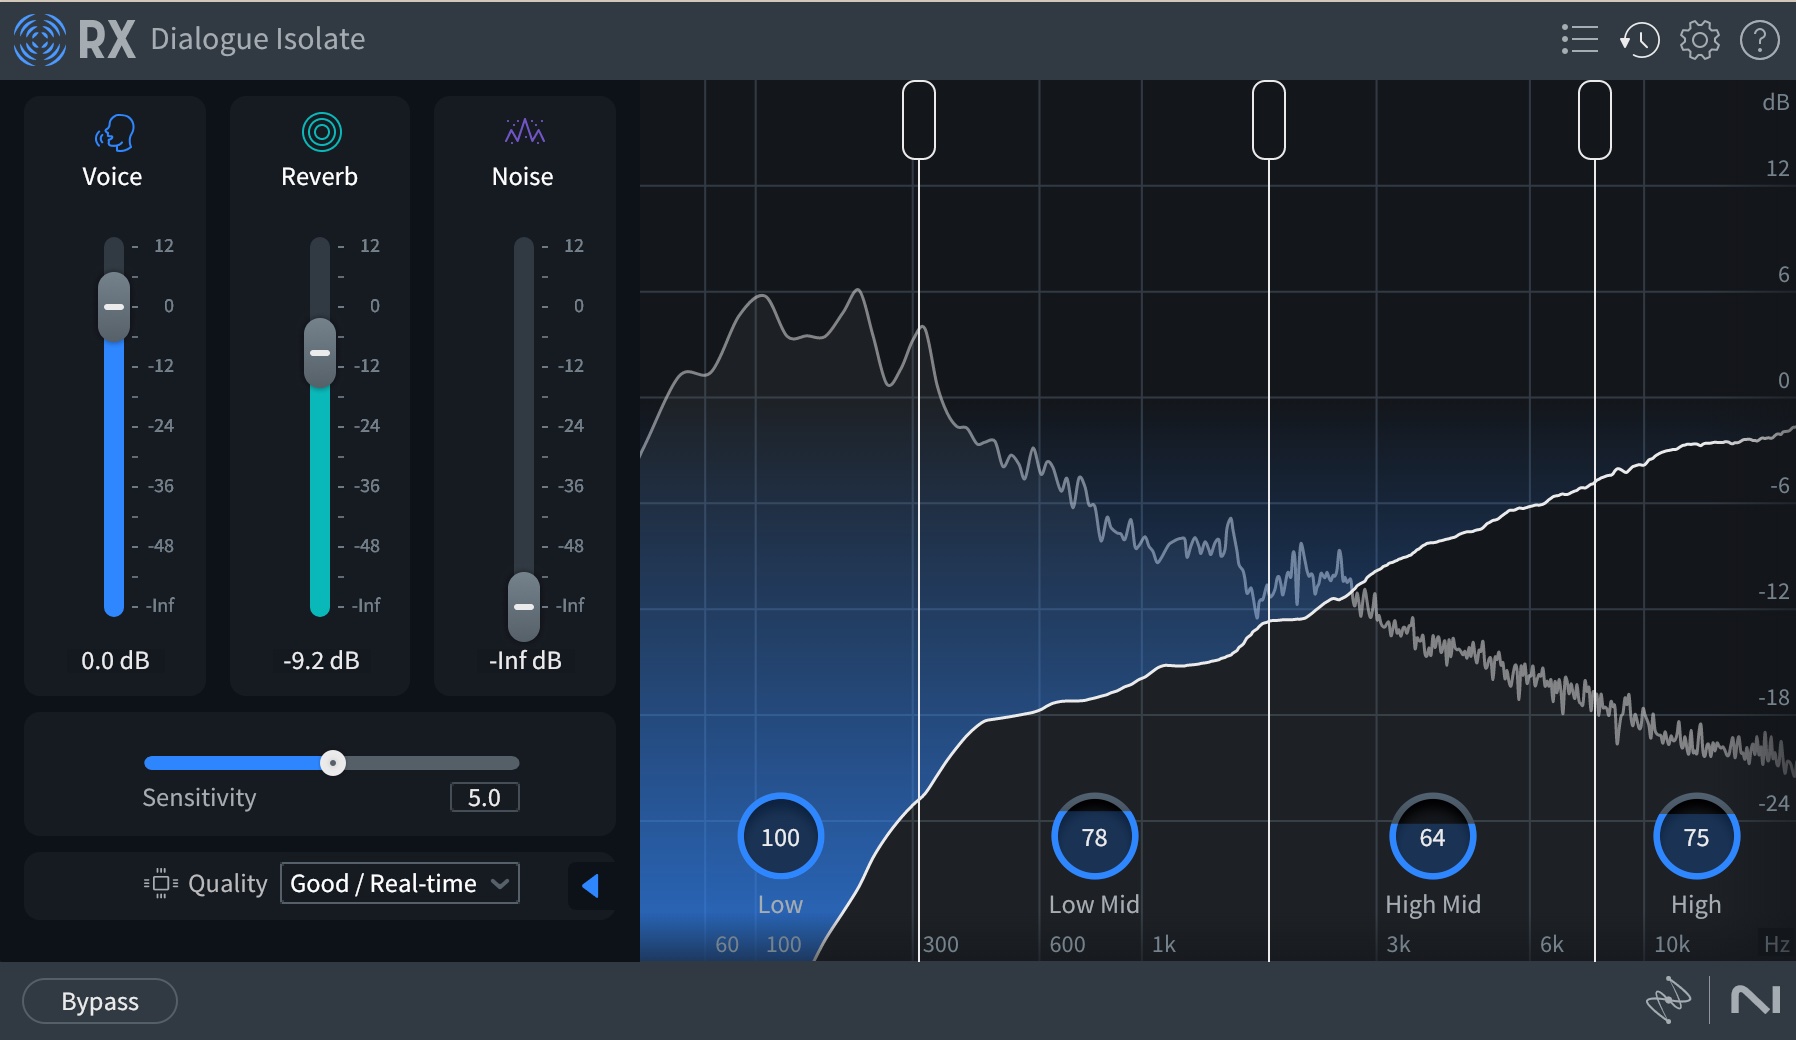
The Editor’s updated Dialogue Isolate module has birthed a companion real-time plug-in for your DAW. Both the module and plug-in employ a new and improved neural net (a machine-learning model that mimics how the brain works), with offline processing in either format, providing the highest-quality results. With RX 11’s debut, the Dialogue De-reverb module has been discontinued and its functionality incorporated into Dialogue Isolate in the form of a Reverb(- reduction) slider. Only the Advanced version of RX 11 lets you adjust the relative strength of De-reverb and/or De-noise processing in four user-delimited frequency bands; drag three lollipop handles left or right to adjust the bands’ crossover points.
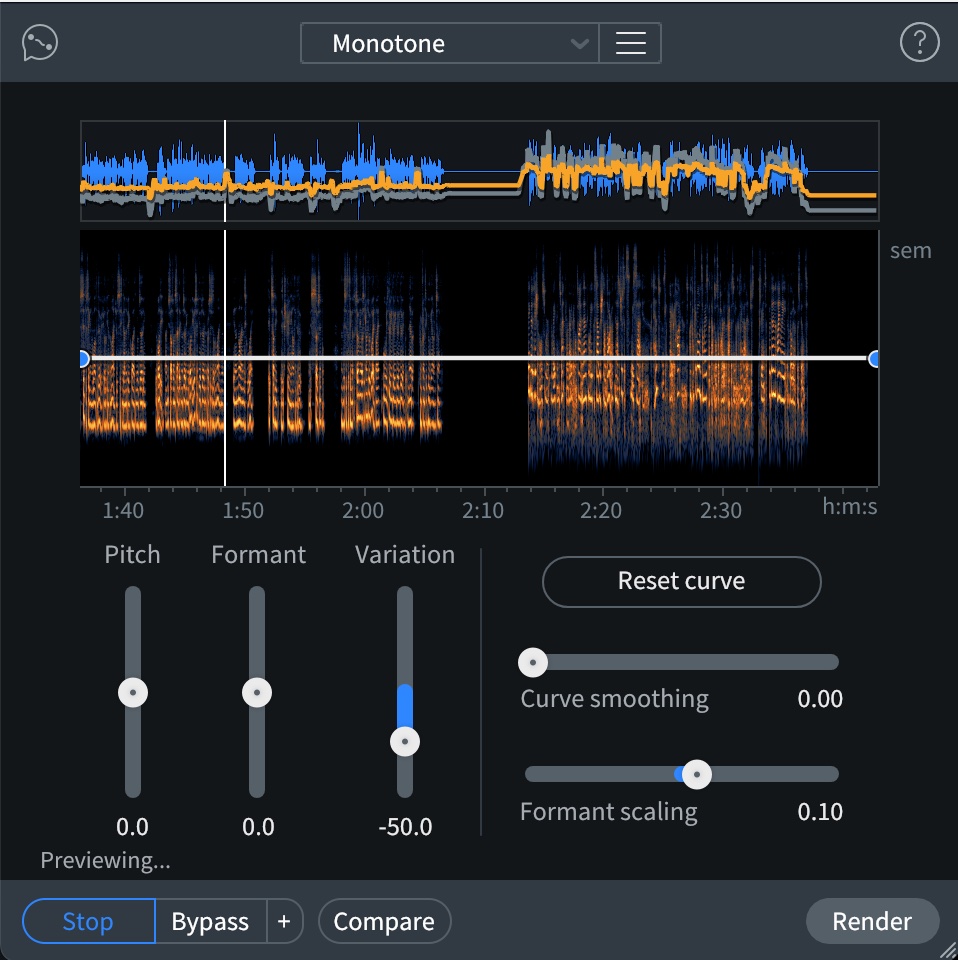
The improved Dialogue Contour module (not available in plug-in form) adds Formant and Variation sliders to its UI; the latter scales the amount of pitch variation in dialog, making it sound more monotone or wide-ranging in pitch. This can be a lifesaver when needing to smoothly comp multiple takes of dialog that have disconcerting variations in pitch dynamics relative to one another.
The Music Rebalance module and plug-in both use a new, state-of-the-art neural net that provides better stem separation than in previous versions of RX. New rotary Sensitivity controls let you adjust how much discretion the stemsplitting algorithm will allow each stem relative to the others, determining in which stem quiet sounds will end up.
Repair Assistant has added a lot of additional controls—threshold sliders, various types of filters, fast/slow response switches, and more— to its UI, giving you greater flexibility in finetuning the automated results initially wrought by its embedded machine learning technology (which, perhaps more importantly, has also been significantly improved).
The updated module and plug-in each use only two modes in RX 11: Voice and Music. (The latter now also handles FX and percussion repair.) All but the Tone section of the module’s UI have an audition button—which monitors audio being removed—in the form of the familiar ear icon. De-noise and De-reverb are lumped into one section to share an audition button—an improvement nonetheless over RX 10, which couldn’t audition De-noise.
ARA (Audio Random Access) functionality has been incorporated into the Spectral Editor plug-in in Apple Logic Pro (in Rosetta mode), providing a more interactive experience. (ARA support for Pro Tools and PreSonus Studio One was added the day this issue went to print and has not been tested here) ARA provides a separate window in Logic that looks like a stripped-down version of the standalone Editor. Adding to the legacy Attenuate and Replace modes that were in RX 10 are new Gain, Declick and De-hum modes. When you use their respective controls to process audio selections in the Spectral Editor, the waveform display in Logic will update to reflect those changes.
STREAM WEAVER
Two new music-centric modules, Streaming Preview and Loudness Optimize, let you quickly prepare your master for optimal playback on Amazon Music, Apple Music, Tidal, YouTube and Spotify. Select a preset—for example, “Amazon Music – HD” or “Spotify – Loud Volume”—in the Streaming Preview module and click the Render button to automatically apply the same loudness normalization and lossy (or lossless) encoding that the corresponding streaming platform will apply. Listening to the rendered file, you can decide whether or not you want to make any further changes to your master’s processing before releasing it to the streaming platform.
The Loudness Optimize module addresses a weird problem you’re bound to encounter on streaming platforms: A gate that regulates data accumulation in the BS.1770 loudness algorithm affects how Integrated Loudness is measured, potentially resulting in your track streaming at a lower level than others.
If, for example, the soft guitar intro on your master is lower in level than the gate’s threshold, the algorithm will exclude that song section’s data in its calculation of your master’s Integrated Loudness and produce an artificially high LUFS measurement (suggesting the platform needn’t boost your track so much, or at all). If you raise the intro’s level barely enough to exceed the gate’s threshold, its data will then be included in the algorithm’s calculation. But because the intro’s increased level is still relatively quiet, its contribution to the Integrated Loudness calculation results in a lower LUFS measurement.
That’s actually a good thing, because the streaming platform’s follow-on loudness normalization will make your master louder to compensate for its relatively low LUFS measurement. Your challenge, of course, is to raise the level of all the low sections of your master without going overboard (or taking forever to do so).
RX’s Loudness Optimize module provides a surgical upward-compressor that does the trick. Manually setting its Boost (gain), Threshold, Ratio and (processing-)Speed controls from scratch to obtain the best results can be time-consuming. Instead, click on the module’s Learn button. An intelligent process will then automatically run numerous variations of control settings to find which combination will most effectively raise quiet sections of your master just enough to reduce your master’s calculated LUFS. Voila! Your master will now stream at a louder level. Don’t worry, your track’s peak levels will not be altered.
One last goodie: You can refresh audio devices in RX 11’s Preferences without needing to first restart the RX app. Slick!
RESURRECTION
An unreleased recording featuring Ashley Cleveland that I had coproduced decades ago had her superb lead vocal unfortunately mixed too low. I’d always wanted to remix the soulful ballad, but the whereabouts of the multitrack tape were unknown. Separation software products I’d tried over the years had failed miserably to separate Ashley’s vocal in the stereo master from the midrange-y mellotron in the mix’s center channel, which all but masked her quieter phrases.
RX 11’s Best(-quality) algorithm for the Music Rebalance module deftly jettisoned the mellotron (and all other instruments) from the vocal stem, isolating Ashley’s track with its wideband fidelity beautifully preserved. The cherry on top was that the studio’s analog plate reverb (the vocal’s console return only!) was included in the vocal separation. I was stunned and overjoyed.
Dialogue Isolate’s new multiband processing also performed a miracle in restoring a decades-old tape recording of a discourse plagued by thunderous hum—producing multiple partials—that at times nearly buried the male voice. By directing the noise reduction to process most vigorously below 311 Hz, I was able to completely eliminate the hum while, to my amazement, fully preserving the speaker’s sonorous timbre. My only complaint was that the Noise and Reverb attenuation sliders share the same multiband control settings, requiring separate passes for noise and reverb reduction to get optimal results.
The new Loudness Optimize module’s “learned” upward compression—which defaults to 120ms response time—sounded laudably transparent most of the time. The exception was on a mix with an instrumental breakdown featuring arpeggiated acoustic guitar, where I could hear unnatural amplitude modulation whenever the player plucked a note fretted close to the nut on the boom-inducing D string.
The solution was to return RX’s history to its previous state, crank the module’s Speed control to 500 ms, reduce the default 4:1 ratio, and click Learn again. (The “Slow and Mellow” module preset will get you similar results in the blink of an eye.) This yielded virtually the same amount of boost (0.2 LU lower), and without pumping.
The Dialogue Contour module yielded good results as long as I handled the new Formant and Variation sliders with kid gloves. The Variation slider, in particular, posed significant tradeoffs when making anything other than subtle adjustments: Lowering it enough to make a voice sound almost monotone also raised the speaker’s pitch and cut low frequencies a lot. On the other hand, raising the slider too much lowered the pitch and boosted the low end. That said, I imagine these artifacts can be used for creative effect in sound design.
I was happy to note that the upgraded Repair Assistant plug-in treated poorly recorded music tracks more transparently than it had in previous versions of RX, better preserving dynamics and low-frequency content.
IS ADVANCED WORTH THE PRICE?
While RX 11 Standard might suffice for music production (yes, it includes Loudness Optimize and Streaming Preview), the Advanced version is as vital as food and water for professionals working in post-production and restoration. Including legacy features, Advanced offers 11 incredibly powerful modules—De-rustle, Dewind, Spectral Recovery and others—that the Standard issue lacks.
In terms of practical utility, RX 11 Advanced is also arguably a bigger upgrade than RX 10 Advanced was to its predecessor. I won’t equivocate. The panoply of powerful new offerings makes RX 11 Advanced a must-have.