Taken from our April, 2025 issue, Steve La Cerra’s deep dive into the Allen & Heath Avantis Solo console is the longest product review in Mix history! Since it runs nearly 5,000 words, we’re doing something we’ve never done before: breaking it up across multiple parts to make it more manageable to read online. Don’t pass up Part 1 and Part 2!
UTILITY VIEW
Utility View has five tabs: Status, Memory, Utilities, MIDI and USB Audio. Status is where you can see the firmware version, the current scene, add an Admin password or new user, lock the console, or safely power down. Memory hosts the Show Manager and Library Manager (Store, Recall, Copy to USB or vice-versa). Utilities is where you find History, Date/Time, Calibration (faders) and Firmware (update). The MIDI tab allows custom MIDI messages to be assigned to faders, all six rotary functions (Gain, Pan, Send and Custom 1-3), Mute, Mix and P/AFL keys.
The last tab in Utility View is USB Audio, which contains a two-track player that can be assigned to any two input channels, and a twotrack recorder that can be fed from any two output buses and records audio at 24-bit/96 kHz resolution, with approximately eight hours of record time available).
Recordings are date- and time-stamped and can be exported to a USB thumb drive, but the files cannot be named. Anytime the recorder is active, a REC indicator appears in the Status Bar. The player can play tracks imported from a USB stick into the track library or can play files directly off the USB drive. The track player plays .WAV or MP3 files and doesn’t seem to care much about sample rate of the source files(!).
LET’S GET DOWN TO MIXIN’
The Avantis Solo comes from the factory loaded with three scenes in the scene library that are locked and cannot be deleted. They can, of course, be used as templates and modified for building a user-preferred layout. Be sure to start with the Scene called Avantis Solo so that the audio I/O patching matches the audio I/O available.
The six Strip Rotary Mode buttons located beneath the T&T encoder assign specific parameters to the channel rotary controls. Three of these are factory-set to Gain, Pan and Sends, and they can’t be changed. The other three buttons can be user-defined but default to PEQ, HPF frequency and Dynamics, which I found very useful.
When User 1 is chosen, PEQ controls for the selected channel are mapped to the rotaries, and parameter values are displayed underneath the Name Block. User 2 maps HPF frequency for each channel to its respective encoder, but you can’t turn the filters on or off from here. User 3 (Dynamics) maps the main controls for both the gate and compressor of the selected channel to the rotaries, enabling you to adjust dynamics without opening the channel’s Dynamics Processing Block. These controls speed up workflow considerably.
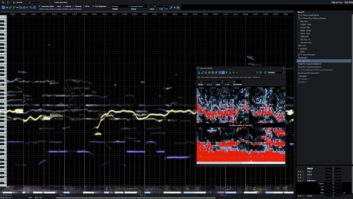
The Swipe Menu on the lower left of the screen offers two pages. Page 1 contains four buttons: Listen, Options, dB/IO/Name and Help. Listen is an incredibly powerful tool whereby holding it will display an overlay of headphone icons at various points in the signal path of a channel. Tap the headphone icon at a particular processing block to hear audio at that point in the path via the P/AFL bus (e.g., headphones or a cue monitor). This is incredibly useful for chasing down problems like distortion.
Page two of the Swipe menu is a 22-segment P/AFL meter that, alas, cannot be re-assigned to indicate L/R Mix bus level without P/AFL’ing the L/R Main channel. If you want to see L/R bus level consistently, you’ll have to assign the L/R bus to a fader strip and Freeze it. I’d like to see a future software revision where the P/AFL meter can be assigned to the L/R Mix bus.
Equally useful is the Options button, which unveils a variety of settings that might otherwise go undiscovered depending on what View you’re in. For example, in Bank View, tapping Options does nothing—but if you’re in the Inputs or Outputs tabs in the IO View, touching Options brings a blue overlay with the message: IO Patching Options. Tapping the screen opens a dialog with choices such as “Confirm when reassigning” (on/off) or “Only patch when the ‘Patch’ button is pressed” (on/off). This button is your friend! Use it!
AUX SENDS
As mentioned earlier, Avantis Solo can route a maximum of 42 buses and you can configure them however you want, with one exception: There must always be at least one stereo P/AFL bus in the configuration, leaving 40 assignable buses remaining(!). Processing available on every Aux bus includes External Input Source (which enables you to patch an input directly into a mix bus; useful for combining console outputs), Insert, PEQ, 28-band Graphic EQ (GEQ), Compressor and Delay (output delay up to 680 mS).
By default, all inputs are switched ON to every Mix (Aux), Matrix, FX, Group and Main output bus. This can be changed by pressing Mix on the desired mix bus output channel, then holding Assign and tapping Mix on the channels you wish to assign/unassign to the Mix. Sends can be quickly set to pre- or post-fader globally or on a per-channel basis. To toggle all channels between pre and post for a particular Aux, press Mix on that Aux channel, hold the Pre key, then tap the Aux channel’s Name Block. To change pre/post status on a single input channel: select the channel, hold Pre and tap the channel’s Name Block. By default, all Auxes are sourced post-PEQ and pre-compressor, but this can be changed to post-preamp, post-insert return A or post-delay.
To assign the strip rotaries to a send, press the Mix button on the desired Aux channel, then press Sends (the currently active mix is shown in the Status Bar). Sends on faders mode is engaged simply by tapping Mix on the output Mix you wish to adjust, but beware that if the Strip Rotary Mode is set to Sends, you cannot access sends on fader mode.
There’s no indication in an Aux channel Name Block of the global status (pre- or postfader) of the send, and even when you change pre/post status, there’s no indication of what happened, so you’ll want to be on a Routing page that shows status of that send on a channel. A&H needs to address this in a future revision.